How To Create Windows Container In Docker
Are you new to Docker Windows Images? Are you currently working in a Windows shop and curious to learn about Docker builds for container images? You have come to the right place. The best way to learn about new something is by doing with the docker build and docker build "tag" commands!
In this article, you are going to learn how to create your first Windows Docker image from a Dockerfile using the docker build command.
Let's get started!
Understanding Docker Container Images
For years, the only way to test or perform development on multiple operating systems (OS) was to have several dedicated physical or virtual machines imaged with the OS version of your choice. This methodology required more hardware and overhead to provision new machines for each software and OS specification.
However, these days the usage of Docker container images has grown partly due to the popularity of micro-service architecture. In response to the rise in Docker's popularity, Microsoft has started to publicly support Docker images for several flagship products on their Docker Hub page. They have even added native support for images for Windows as a product feature in Windows 10 and Windows Server 2016!
A Docker image is run on a container by using the Docker Engine. Docker images have many benefits such as portability (applicable to multiple environments and platforms), customizable, and highly scalable. As you can see below, unlike traditional virtual machines, the Docker engine runs on a layer between the host OS kernel and the isolated application services that are being containerized.
Understanding Docker Build and Images
The docker build command can be leveraged to automate container image creation, adopt a container-as-code DevOps practice, and integrate containerization into the development cycle of your projects. Dockerfiles are simply text files that contain build instructions used by Docker to create a new container image that is based on an existing image.
The user can specify the base image and list of commands to be run when a container image is deployed or startup for the first time. In this article, you will learn how to create a Windows-based docker image from Dockerfile using a Windows container.
This process has several benefits over using a pre-built container image:
- You are able to rebuild a container image for several versions of Windows – which is great for testing code changes on several platforms.
- You will have more control over what is installed in the container. This will allow you to keep your container size to a minimum.
- For security reasons, you might want to check the container for vulnerabilities and apply security hardening to the base image
Prerequisites/Requirements
This article is a walkthrough on learning about learning how to build a Docker image using a Dockerfile. If you'd like to follow along, ensure that you have the following prerequisites in place.
- Docker for Windows installed. I'll be using the Docker Community Edition (CE) version 2.1.0.4 in my environment.
- Internet access is needed for downloading the Docker images
- Windows 10+ Operating System (version 1709 is being used for this tutorial)
- Nested virtualization enabled
- 5 GB of free diskspace on your local machine
- PowerShell 5.0+
- This tutorial uses the Visual Studio Code IDE. However feel free to use what ever IDE you'd prefer.
Note: Be sure to enable Windows Containers Configuration when installing Docker.
Getting Prepared
You'll first need a folder to store all of the Docker images and containers you'll be building from those images. To do so, open a Powershell or cmd terminal (you'll be using PowerShell throughout this article) and create a new directory called C:\Containers.
Once the folder is created, change to that directory. This puts the console's current working directory to C:\Containers to default all downloads to this directory.
PS51> mkdir C:\Containers PS51> cd C:\Containers In this article, you'll get a headstart. Most of the files to work through this project are already available. Once the folder is created, perform a Git pull to copy over the files needed for this article from the TechSnips Github repository to the C:\Containers folder. Once complete, check to make sure that the C:\Containers folder looks like below.

Downloading the IIS Windows Docker Image
The first task to perform is to download a "template" or base image. You'll be building your own Docker image later but first, you need an image to get started with. You'll be downloading the latest IIS and Windows Server Core Images that are required for this tutorial. The updated list of images can be found on the official Microsoft Docker hub image page.
Reviewing the Current Docker Base Images
Before downloading the image from the image repository, let's first review the current Docker base images that you currently have on your local system. To do so, run a PowerShell console as Administrator and then type docker images. This command returns all images on your local system.
As you can see below, the images available are initially empty.
PS51> docker images 
Downloading the Base Image
Now it's time to download the base IIS image from Docker Hub. To do so, run docker pull as shown below. This process can take some time to complete depending on your internet speeds.
PS51> docker pull mcr.microsoft.com/windows/servercore/iis 
Now run docker images and you should have the latest Microsoft Windows Core IIS image available for this tutorial.
PS51> docker images 
Inspecting the Dockerfile
In an earlier step, you had downloaded an existing Dockerfile for this tutorial. Let's now take a look at exactly what that entails.
Open the C:\Containers\Container1\Dockerfile file in your favorite editor. The contents of this Dockerfile are used to define how the container image will be configured at build time.
You can see an explanation of what each piece of this file does in the in-line comments.
# Specifies that the latest microsoft/iis image will be used as the base image # Used to specify which base container image will be used by the build process. # Notice that the naming convention is "**owner/application name : tag name**" # (shown as microsoft/iis:latest); so in our case the owner of the image is # Microsoft and the application is IIS with the "latest" tag name being used # to specify that you will pull the most recent image version available. FROM microsoft/iis:latest # Copies contents of the wwwroot folder to the inetpub/wwwroot folder in the new container image # Used to specify that you want to copy the WWWroot folder to the IIS inetpub WWWroot # folder in the container. You don't have to specify the full path to your local # files because docker already has the logic built-in to reference files and folders # relative to the docker file location on your system. Also, make note that that # docker will only recognize forward slashes for file paths - since this is a # Windows based container instead of Linux. COPY wwwroot c:/inetpub/wwwroot # Run some PowerShell commands within the new container to set up the image # Run the PowerShell commands to remove the default IIS files and create a new # application pool called TestPool RUN powershell Remove-Item c:/inetpub/wwwroot/iisstart.htm -force RUN powershell Remove-Item c:/inetpub/wwwroot/iisstart.png -force RUN powershell Import-Module WebAdministration RUN powershell New-WebAppPool -Name 'TestPool' # Exposes port 80 on the new container image # Used to open TCP port 80 for allowing an http connection to the website. # However, this line is commented out, because the IIS container has this port # already open by default. #EXPOSE 80 # Sets the main command of the container image # This tells the image to run a service monitor for the w3svc service. # When this is specified the container will automatically stop running # if the w3svc service stopped. This line is commented out because of the # IIS container already has this entrypoint in place by default. #ENTRYPOINT ["C:\\ServiceMonitor.exe", "w3svc"] Building a New Docker Image
You've got the Dockerfile ready to go and a base IIS image downloaded. Now it's time to build your new Docker image using the Dockerfile.
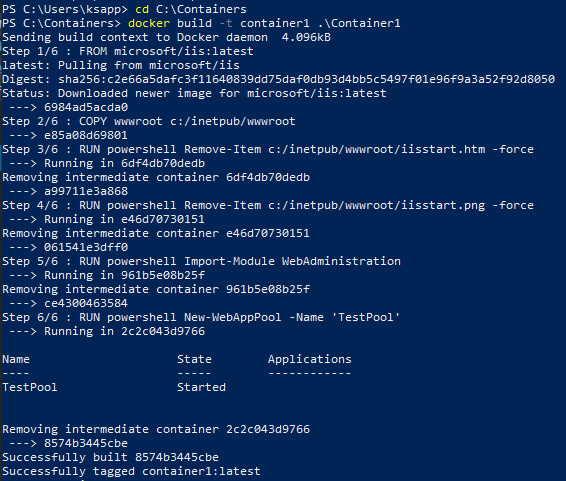
To build a new image, use the docker build "tag" command. This command creates the image. For this article, you can see below you're also using the -t ** option which replaces the "tag" portion. This option allows you to give your new image a friendly tag name and also reference the Dockerfile by specifying the folder path where it resides.
Below you can see an example of ensuring the console is in the C:\Containers directory and then building a new image from the Dockerfile in the C:\Containers\Container1 directory.
PS51> cd C:\Containers PS51> docker build -t container1 .\Container1 Once started, you can see the progress of the command as it traverses each instruction in the docker file line by line:

Once done, you should now have a new Docker image!
Now run the docker images command to view the images that are available. You can see below an example of the container1 image created.

Note: The
docker build —helpcommand is a useful parameter to display detailed information on the docker command being run.
Running the Docker Container
At this point, you should have a new image created. It's time to spin up a container using that image. To bring up a new container, use the docker run command.
The docker run command will bring up a new Docker container based on the container1 image that you created earlier. You can see an example of this below.
Notice that the -d parameter is used. This tells the docker runtime to start the image in the detached mode and then exit when the root process used to run the container exits.
When docker run completes, it returns the ID of the container created. The example below is capturing this ID into a $containerID variable so we can easily reference it later.
PS51> $containerID = docker run -d container1 PS51> $containerID 
Once the container is brought up, now run the docker ps command. This command allows you to see which containers are currently running using each image. Notice below that the running image is automatically generated a nickname (busy_habit in this case). This nickname is sometimes used instead of the container ID to manage the container.

Running Code Inside a Docker Container
A new container is built from a new image you just created. Let's now start actually using that container to run code. Running code inside of a Docker container is done using the docker exec command.
In this example, run docker exec to view PowerShell output for the Get-ChildItem command in the container using the command syntax below. This will ensure the instructions in the Dockerfile to remove the default IIS files succeeded.
PS51> docker exec $containerID powershell Get-ChildItem c:\inetpub\wwwroot You can see below that the only file that exists is index.html which means the default files were removed.

Now run the ipconfig command in the container to get the local IP address of the container image so that you can try to connect to the IIS website.
PS51> docker exec $containerID ipconfig You can see below that ipconfig was run in the container just as if running on your local computer and has return all of the IP information.

ipconfig in a Docker containerInspecting the IIS Website
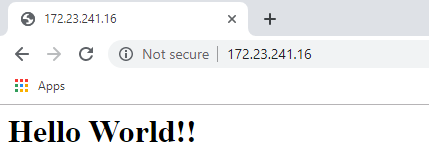
Now it's time to reveal the fruits of your labor! It's time to see if the IIS server running in the Docker container is properly serving up the index.html page.
Open a browser and paste the IP4 Address found via ipconfig into the address bar. If all is well, you should see a Hello World!! message like below.

Reviewing Docker History
One useful command to use when working with Docker containers i the docker history command. Although not necessarily related to creating an image or container itself, the docker history command is a useful command that allows you to review changes made to the container image.
PS51> docker history container1 You can see below, that docker history returns all of the Dockerfile and PowerShell activity performed on the container1 container you've been working with.

docker history Cleaning up the Running Docker Images
The steps below are used to cleanup all stopped containers running on your machine. This will free up diskspace and system resources.
Run the docker ps command to view a list of the containers running on your system:
PS51> docker ps 
Now stop the running containers using the docker stop command:
PS51> docker stop <image nick name: busy_haibt in my case> PS51> docker stop <image nick name: unruffled_driscoll in my case> 
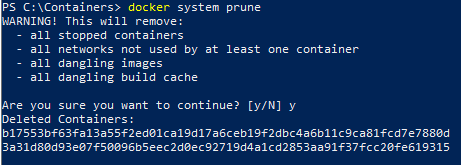
Finally you can permanently remove the stopped containers using the docker system prune command.
PS51> docker system prune 
Further Reading
- Creating Your First Docker Windows Server Container
- How to Manage Docker Volumes on Windows
How To Create Windows Container In Docker
Source: https://adamtheautomator.com/docker-windows-image/
Posted by: mezadogese.blogspot.com

0 Response to "How To Create Windows Container In Docker"
Post a Comment